

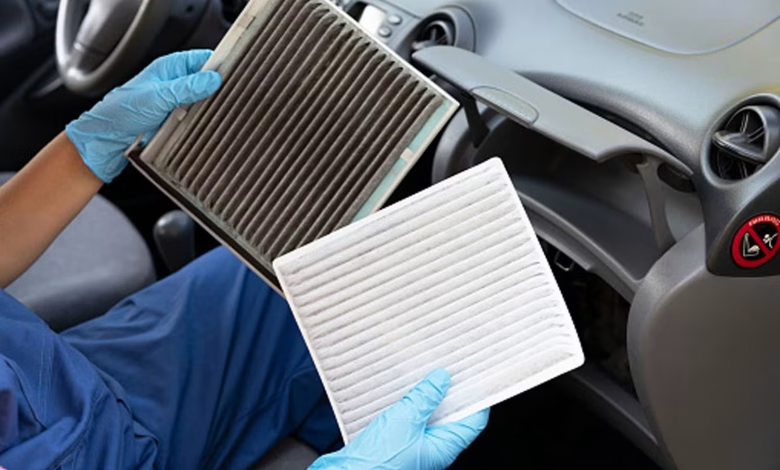
Every driver who has ever sat in an automotive service waiting room knows the routine. You went in for a standard thirty-dollar oil change or a routine tire rotation. Forty-five minutes into your wait, a smiling service advisor approaches holding a rectangular paper filter caked with gray dust and dried leaves. With a furrowed brow, they present it like a hazardous biological specimen and explain that your cabin air filter is severely degraded. Then comes the pitch: they can swap in a fresh one today for a modest eighty to one hundred twenty dollars.
Most vehicle owners, caught off guard and wanting clean air for their families, nod and approve the charge. It feels like responsible preventative maintenance.
In reality, it is the single most profitable, least labor-intensive upsell in the entire automotive retail industry. Replacing a cabin air filter requires virtually zero mechanical skill, demands no expensive diagnostic tools, and takes less time than making a pot of drip coffee. Learning how to handle this three-minute chore in your own driveway keeps substantial cash in your wallet while putting you in direct control of the air quality inside your vehicle.
The Dealership Service Lane Upsell Machine
To understand why service writers push cabin air filters with such religious zeal, you have to look at how service departments generate profit. Automotive dealerships operate on razor-thin margins in the new-car showroom; the back of the house—parts and service—carries the financial weight of the business.
Dealership billing operates on what the industry calls flat-rate hours. Under standard automotive labor guides, replacing a cabin air filter is typically billed at two-tenths to four-tenths of an hour of shop labor. At modern dealership labor rates hovering between $150 and $220 per hour, that pencil stroke alone adds $40 to $80 in pure labor charges.
Next comes the retail parts markup. The dealer charges $35 to $60 for an original equipment manufacturer (OEM) filter that cost them less than eight dollars wholesale.
When you approve the job, the service technician does not spend twenty minutes carefully calibrating anything. They walk to the parts counter, grab a box, open your glove compartment, drop the tray, swap the pleated paper, and snap it shut. The entire operation takes roughly ninety seconds. Paying ninety dollars for ninety seconds of unskilled manual labor works out to an effective hourly rate of $3,600 an hour. There is no justifiable reason for any car owner to pay that premium.
What the Cabin Air Filter Actually Does
Drivers frequently confuse the cabin air filter with the engine air filter. While the engine air filter sits under the hood and prevents grit from entering the combustion cylinders, the cabin air filter is dedicated entirely to human comfort and respiratory health.
Your vehicle draws outside air through the cowl intake vents located at the base of the exterior windshield. That ambient air gets pulled into the climate control system, routed through the blower motor, forced through either the air conditioning evaporator core or heater core, and pumped out of your dashboard registers.
The cabin air filter sits directly in that air stream. It captures airborne contaminants before they can settle into the vehicle interior or lodge inside the delicate components of your HVAC system. A quality filter captures:
-
Fine tree, grass, and weed pollen that triggers seasonal allergies
-
Road dust, brake lining dust, and pulverized tire rubber kicked up on the highway
-
Diesel exhaust soot and particulate matter (PM2.5) from commercial traffic
-
Decaying organic matter like leaf fragments, pine needles, and insects
-
Mold spores and mildew circulating during damp spring and fall months
The Hidden Consequences of Neglecting the Filter
Skipping the replacement altogether is not the answer. When a cabin air filter becomes completely choked with debris, the airflow to your cabin drops off noticeably. Your air conditioner struggles to cool the cabin on sweltering summer afternoons, and your defroster takes twice as long to clear a fogged windshield on freezing mornings.
Worse, a choked filter forces the squirrel-cage blower motor to work against intense static head pressure. Because the electric motor relies on the moving air stream to cool its internal windings, restricted airflow causes the motor to overheat. Over time, this leads to premature blower motor failure or burns out the blower motor resistor pack, turning a fifteen-dollar filter swap into a three-hundred-dollar electrical repair.
Furthermore, moisture collected on organic leaf litter trapped inside the filter housing creates an ideal breeding ground for bacteria and mold, producing that sour, gym-sock odor every time you switch on the fan.
Filter Media Options: Upgrading Beyond Factory Paper
When you purchase a replacement filter yourself, you get to choose the level of filtration rather than accepting the baseline paper unit the dealer provides. Walk into an auto parts store or browse an online retailer, and you will encounter three primary varieties of filter media.
Standard Particulate Filters
These entry-level filters are constructed from pleated cellulose paper or synthetic non-woven polymer fibers. They cost between $10 and $15 and excel at trapping physical particulate matter like dirt, pollen, and pet hair. However, because they are purely mechanical barriers, they do nothing to neutralize gaseous odors, diesel fumes, or chemical exhaust smells.
Activated Carbon and Charcoal Filters
For roughly five to eight dollars more, upgrading to an activated charcoal filter provides a dramatic improvement in cabin air quality. The synthetic fibers are impregnated with crushed coconut shells or coal-based carbon that has been treated with oxygen to open up millions of microscopic pores.
Through the chemical process of adsorption, the porous carbon attracts and traps volatile organic compounds (VOCs), smog, unburned hydrocarbon fumes, and unpleasant roadside odors before they penetrate the cabin. If you commute through heavy metropolitan traffic, follow commercial freight routes, or live near industrial zones, activated carbon is well worth the modest twenty-dollar price tag.
High-Efficiency Particulate (HEPA) and Antimicrobial Filters
At the high end of the spectrum, specialized HEPA-rated filters feature dense, electrostatically charged microfibers that capture up to 99.97% of airborne particles down to 0.3 microns in size. Some include antimicrobial coatings that actively prevent bacteria and fungal spores from multiplying on the filter surface.
These filters generally cost between $25 and $35. They are a game-changer for drivers with severe asthma or acute seasonal allergies, though they require slightly more frequent changes because their ultra-dense weave fills up faster.
The Five-Minute Driveway Replacement Guide
On roughly 85 percent of modern passenger cars, crossover SUVs, and pickup trucks sold in the United States, accessing the cabin air filter requires zero tools. Automakers usually position the housing directly behind the interior glove compartment.
Before starting, clear out the glove box so you do not dump registration papers, tire gauges, and charging cables across the passenger floorboards.
Step 1: Disconnect the Glove Box Damper Arm
Open the glove box fully. Look at the lower outer edge on the right-hand side. Most modern vehicles feature a small mechanical strut or nylon tether called a damper arm, which gives the glove box its smooth, soft-opening feel.
Grasp the plastic connector at the end of the damper rod and gently pull or unhook it toward the right. It snaps free from its mounting peg with light fingertip pressure. Do not yank on it with pliers; the plastic pivot is designed for tool-free disengagement.
Step 2: Release the Retention Stops
With the damper disconnected, the glove box is held in place by two small rubber-cushioned retention tabs located on the interior upper side walls.
Reach inside the glove box, place one hand on the left inner wall and one hand on the right inner wall, and squeeze both sides inward toward the center. This flexes the plastic box inward just enough for the tabs to clear the dashboard frame. Once the tabs clear, the entire glove box assembly swings all the way down toward the floor, exposing the mechanical HVAC box behind it.
On some domestic and European vehicles, instead of squeezing the sides, you simply rotate two circular plastic retaining pegs a quarter-turn counterclockwise and pull them straight out.
Step 3: Remove the Access Cover
Directly behind the lowered glove box, you will see a black plastic housing with a horizontal rectangular door roughly ten inches wide and two inches tall.
Look for plastic squeeze tabs on the left and right ends of this door. Squeeze the outer latches inward or lift the locking clip, and the faceplate will swing open or lift completely away.
Step 4: Clear Debris and Note the Airflow Direction
Before yanking the old filter out, take a flashlight and look at the printed face of the frame. You will see a small directional arrow accompanied by the words Air Flow.
Memorizing the direction of that arrow is critical. Automotive HVAC systems universally draw air from the top cowl downward toward the floor-mounted blower fan, meaning the vast majority of cabin filter arrows point downward. However, check your existing unit before removing it to be completely certain.
Slowly slide the dirty filter out of its channel. Do this gently so you do not dump accumulated dry leaves, seeds, or pine needles down into the open spinning wheel of the blower motor. If loose debris has settled inside the housing cavity, reach in with a narrow vacuum attachment or your fingers to clean out the plastic tray before sliding the new filter in.
Step 5: Install the New Filter and Reassemble
Unbox your new filter. Double-check that the printed airflow arrow on the new filter points in the exact same direction as the one you just pulled out.
Gently compress the sides slightly and slide the filter all the way back into the tracks until it sits flush against the rear wall. Snap the plastic faceplate back on until both tabs click firmly into place.
Lift the glove compartment back upward, squeeze the side walls slightly so the retaining stops pop back into the dash frame, and snap the damper arm back onto its pivot peg. You are finished.
Navigating the Awkward Exceptions
While the vast majority of Japanese, Korean, and American vehicles use the straightforward glove box method outlined above, a few automotive platforms present slightly more stubborn layouts.
Certain Ford and Mazda vehicles from the early 2010s positioned the filter vertically along the right side of the driver-side footwell, requiring you to remove a plastic kick panel and contort yourself under the dashboard with a small ratchet or Torx driver. Older Nissan platforms sometimes feature a narrow vertical slot behind the center console where the filter must be squeezed like an accordion to fit through a slot smaller than the filter itself.
Other vehicles, including certain BMW and older Mercedes models, locate the filter outside the cabin underneath the exterior plastic windshield cowl, requiring you to pop the hood and loosen three or four plastic thumb screws along the firewall.
Even on these outlier designs, the job rarely takes more than fifteen minutes with a basic screwdriver. A five-minute search on an online video platform using your specific year, make, and model will show you the exact clip locations, transforming what seems like a mysterious dash disassembly into a simple weekend task.
Establishing a Sensible Replacement Cadence
Dealerships often claim you need a new filter every single time you change your oil. Unless you are driving exclusively down unpaved dirt access roads, that frequency is unnecessary and wasteful.
For the average American driver, replacing the cabin air filter every 12,000 to 15,000 miles or once a year represents the ideal sweet spot.
However, external environmental conditions dictate real-world wear. If you live in regions prone to summer wildfire smoke, dense pine pollen blooms in the spring, or prolonged desert dust storms, check the filter every six months. The beauty of knowing how to access the housing yourself is that inspecting the filter costs zero dollars. If you pull it out and see clean, white pleats with no caked grime, slide it right back in and check it again next season.
Taking control of this elementary maintenance task does more than save eighty dollars a year. It eliminates one of the most common high-pressure tactics used in the service lane, giving you the confidence to say no to expensive upsells and keeping your vehicle breathing clean, fresh air on your own terms.


